Qt new functions
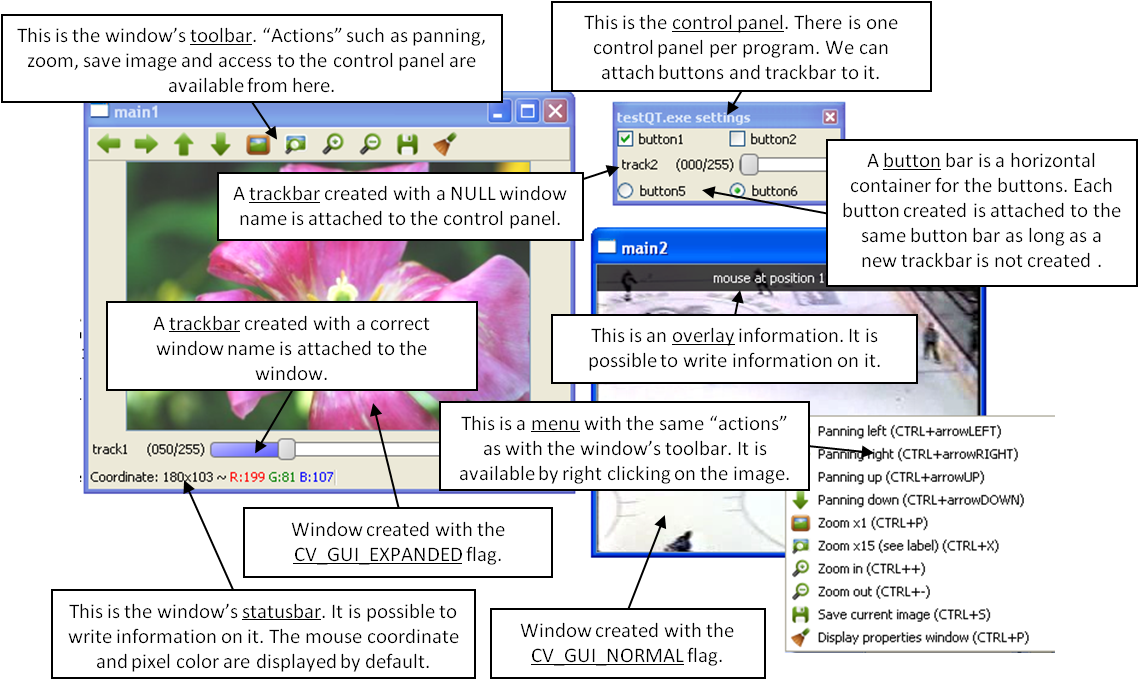
This figure explains the new functionalities implemented with Qt GUI. As we can see, the new GUI provides a statusbar, a toolbar, and a control panel. The control panel can have trackbars and buttonbars attached to it.
- To attach a trackbar, the window _ name parameter must be NULL.
- To attach a buttonbar, a button must be created. If the last bar attached to the control panel is a buttonbar, the new button is added on the right of the last button. If the last bar attached to the control panel is a trackbar, or the control panel is empty, a new buttonbar is created. Then a new button is attached to it.
The following code is an example used to generate the figure.
int main(int argc, char *argv[])
    int value = 50;
    int value2 = 0;

    cvNamedWindow("main1",CV_WINDOW_NORMAL);
    cvNamedWindow("main2",CV_WINDOW_AUTOSIZE | CV_GUI_NORMAL);

    cvCreateTrackbar( "track1", "main1", &value, 255,  NULL);//OK tested
    char* nameb1 = "button1";
    char* nameb2 = "button2";
    cvCreateButton(nameb1,callbackButton,nameb1,CV_CHECKBOX,1);

    cvCreateButton(nameb2,callbackButton,nameb2,CV_CHECKBOX,0);
    cvCreateTrackbar( "track2", NULL, &value2, 255, NULL);
    cvCreateButton("button5",callbackButton1,NULL,CV_RADIOBOX,0);
    cvCreateButton("button6",callbackButton2,NULL,CV_RADIOBOX,1);

    cvSetMouseCallback( "main2",on_mouse,NULL );

    IplImage* img1 = cvLoadImage("files/flower.jpg");
    IplImage* img2 = cvCreateImage(cvGetSize(img1),8,3);
    CvCapture* video = cvCaptureFromFile("files/hockey.avi");
    IplImage* img3 = cvCreateImage(cvGetSize(cvQueryFrame(video)),8,3);

    while(cvWaitKey(33) != 27)
    {
        cvAddS(img1,cvScalarAll(value),img2);
        cvAddS(cvQueryFrame(video),cvScalarAll(value2),img3);
        cvShowImage("main1",img2);
        cvShowImage("main2",img3);
    }

    cvDestroyAllWindows();
    cvReleaseImage(&img1);
    cvReleaseImage(&img2);
    cvReleaseImage(&img3);
    cvReleaseCapture(&video);
    return 0;
}
cv::setWindowProperty
- void setWindowProperty(const string& name, int prop_id, double prop_value)
Change the parameters of the window dynamically.
Parameters: - name – Name of the window.
- prop_id –
Window’s property to edit. The operation flags:
- CV_WND_PROP_FULLSCREEN Change if the window is fullscreen ( CV_WINDOW_NORMAL or CV_WINDOW_FULLSCREEN ).
- CV_WND_PROP_AUTOSIZE Change if the user can resize the window (texttt {CV_WINDOW_NORMAL} or CV_WINDOW_AUTOSIZE ).
- CV_WND_PROP_ASPECTRATIO Change if the image’s aspect ratio is preserved (texttt {CV_WINDOW_FREERATIO} or CV_WINDOW_KEEPRATIO ).
- prop_value –
New value of the Window’s property. The operation flags:
- CV_WINDOW_NORMAL Change the window in normal size, or allows the user to resize the window.
- CV_WINDOW_AUTOSIZE The user cannot resize the window, the size is constrainted by the image displayed.
- CV_WINDOW_FULLSCREEN Change the window to fullscreen.
- CV_WINDOW_FREERATIO The image expends as much as it can (no ratio constraint)
- CV_WINDOW_KEEPRATIO The ration image is respected.
The function `` setWindowProperty`` allows to change the window’s properties.
cv::getWindowProperty
- void getWindowProperty(const char* name, int prop_id)
Get the parameters of the window.
Parameters: - name – Name of the window.
- prop_id –
Window’s property to retrive. The operation flags:
- CV_WND_PROP_FULLSCREEN Change if the window is fullscreen ( CV_WINDOW_NORMAL or CV_WINDOW_FULLSCREEN ).
- CV_WND_PROP_AUTOSIZE Change if the user can resize the window (texttt {CV_WINDOW_NORMAL} or CV_WINDOW_AUTOSIZE ).
- CV_WND_PROP_ASPECTRATIO Change if the image’s aspect ratio is preserved (texttt {CV_WINDOW_FREERATIO} or CV_WINDOW_KEEPRATIO ).
See setWindowProperty to know the meaning of the returned values.
The function `` getWindowProperty`` return window’s properties.
cv::fontQt
- CvFont fontQt(const string& nameFont, int pointSize = -1, Scalar color = Scalar::all(0), int weight = CV_FONT_NORMAL, int style = CV_STYLE_NORMAL, int spacing = 0)
Create the font to be used to draw text on an image.
Parameters: - nameFont – Name of the font. The name should match the name of a system font (such as ``Times’‘). If the font is not found, a default one will be used.
- pointSize – Size of the font. If not specified, equal zero or negative, the point size of the font is set to a system-dependent default value. Generally, this is 12 points.
- color – Color of the font in BGRA – A = 255 is fully transparent. Use the macro CV _ RGB for simplicity.
- weight –
The operation flags:
- CV_FONT_LIGHT Weight of 25
- CV_FONT_NORMAL Weight of 50
- CV_FONT_DEMIBOLD Weight of 63
- CV_FONT_BOLD Weight of 75
- CV_FONT_BLACK Weight of 87
You can also specify a positive integer for more control.
- style –
The operation flags:
- CV_STYLE_NORMAL Font is normal
- CV_STYLE_ITALIC Font is in italic
- CV_STYLE_OBLIQUE Font is oblique
- spacing – Spacing between characters. Can be negative or positive
The function fontQt creates a CvFont object. This CvFont is not compatible with putText.
A basic usage of this function is:
CvFont font = fontQt(''Times'');
addText( img1, ``Hello World !'', Point(50,50), font);
cv::addText
- void addText(const Mat& img, const string& text, Point location, CvFont *font)
Create the font to be used to draw text on an image
Parameters: - img – Image where the text should be drawn
- text – Text to write on the image
- location – Point(x,y) where the text should start on the image
- font – Font to use to draw the text
The function addText draw text on the image img using a specific font font (see example fontQt )
cv::displayOverlay
- void displayOverlay(const string& name, const string& text, int delay)
Display text on the window’s image as an overlay for delay milliseconds. This is not editing the image’s data. The text is display on the top of the image.
Parameters: - name – Name of the window
- text – Overlay text to write on the window’s image
- delay – Delay to display the overlay text. If this function is called before the previous overlay text time out, the timer is restarted and the text updated. . If this value is zero, the text never disapers.
The function displayOverlay aims at displaying useful information/tips on the window for a certain amount of time delay . This information is display on the top of the window.
cv::displayStatusBar
- void displayStatusBar(const string& name, const string& text, int delayms)
Display text on the window’s statusbar as for delay milliseconds.
Parameters: - name – Name of the window
- text – Text to write on the window’s statusbar
- delay – Delay to display the text. If this function is called before the previous text time out, the timer is restarted and the text updated. If this value is zero, the text never disapers.
The function displayOverlay aims at displaying useful information/tips on the window for a certain amount of time delay . This information is displayed on the window’s statubar (the window must be created with CV_GUI_EXPANDED flags).
cv::createOpenGLCallback
_
- void createOpenGLCallback(const string& window_name, OpenGLCallback callbackOpenGL, void* userdata CV_DEFAULT(NULL), double angle CV_DEFAULT(-1), double zmin CV_DEFAULT(-1), double zmax CV_DEFAULT(-1)
Create a callback function called to draw OpenGL on top the the image display by windowname.
Parameters: - window_name – Name of the window
- callbackOpenGL – Pointer to the function to be called every frame. This function should be prototyped as void Foo(*void); .
- userdata – pointer passed to the callback function. (Optional)
- angle – Specifies the field of view angle, in degrees, in the y direction.. (Optional - Default 45 degree)
- zmin – Specifies the distance from the viewer to the near clipping plane (always positive). (Optional - Default 0.01)
- zmax – Specifies the distance from the viewer to the far clipping plane (always positive). (Optional - Default 1000)
The function createOpenGLCallback can be used to draw 3D data on the window. An example of callback could be:
void on_opengl(void* param)
{
    glLoadIdentity();

    glTranslated(0.0, 0.0, -1.0);

    glRotatef( 55, 1, 0, 0 );
    glRotatef( 45, 0, 1, 0 );
    glRotatef( 0, 0, 0, 1 );

    static const int coords[6][4][3] = {
        { { +1, -1, -1 }, { -1, -1, -1 }, { -1, +1, -1 }, { +1, +1, -1 } },
        { { +1, +1, -1 }, { -1, +1, -1 }, { -1, +1, +1 }, { +1, +1, +1 } },
        { { +1, -1, +1 }, { +1, -1, -1 }, { +1, +1, -1 }, { +1, +1, +1 } },
        { { -1, -1, -1 }, { -1, -1, +1 }, { -1, +1, +1 }, { -1, +1, -1 } },
        { { +1, -1, +1 }, { -1, -1, +1 }, { -1, -1, -1 }, { +1, -1, -1 } },
        { { -1, -1, +1 }, { +1, -1, +1 }, { +1, +1, +1 }, { -1, +1, +1 } }
    };

    for (int i = 0; i < 6; ++i) {
                glColor3ub( i*20, 100+i*10, i*42 );
                glBegin(GL_QUADS);
                for (int j = 0; j < 4; ++j) {
                        glVertex3d(0.2 * coords[i][j][0], 0.2 * coords[i][j][1], 0.2 * coords[i][j][2]);
                }
                glEnd();
    }
}
cv::saveWindowParameters
_
- void saveWindowParameters(const string& name)
Save parameters of the window windowname.
Parameters: - name – Name of the window
The function saveWindowParameters saves size, location, flags, trackbars’ value, zoom and panning location of the window window_name
cv::loadWindowParameters
_
- void loadWindowParameters(const string& name)
Load parameters of the window windowname.
Parameters: - name – Name of the window
The function loadWindowParameters load size, location, flags, trackbars’ value, zoom and panning location of the window window_name
cv::createButton
_
- createButton(const string& button_name CV_DEFAULT(NULL), ButtonCallback on_change CV_DEFAULT(NULL), void* userdata CV_DEFAULT(NULL), int button_type CV_DEFAULT(CV_PUSH_BUTTON), int initial_button_state CV_DEFAULT(0)
Create a callback function called to draw OpenGL on top the the image display by windowname.
Parameters: - button_name – Name of the button ( if NULL, the name will be “button <number of boutton>”)
- on_change – Pointer to the function to be called every time the button changed its state. This function should be prototyped as void Foo(int state,*void); . state is the current state of the button. It could be -1 for a push button, 0 or 1 for a check/radio box button.
- userdata – pointer passed to the callback function. (Optional)
The button_type parameter can be : *(Optional – Will be a push button by default.)
- CV_PUSH_BUTTON The button will be a push button.
- CV_CHECKBOX The button will be a checkbox button.
- CV_RADIOBOX The button will be a radiobox button. The radiobox on the same buttonbar (same line) are exclusive; one on can be select at the time.
- initial_button_state Default state of the button. Use for checkbox and radiobox, its value could be 0 or 1. (Optional)
The function createButton attach a button to the control panel. Each button is added to a buttonbar on the right of the last button. A new buttonbar is create if nothing was attached to the control panel before, or if the last element attached to the control panel was a trackbar.
Here are various example of createButton function call:
createButton(NULL,callbackButton);//create a push button "button 0", that will call callbackButton.
createButton("button2",callbackButton,NULL,CV_CHECKBOX,0);
createButton("button3",callbackButton,&value);
createButton("button5",callbackButton1,NULL,CV_RADIOBOX);
createButton("button6",callbackButton2,NULL,CV_PUSH_BUTTON,1);
Help and Feedback
You did not find what you were looking for?- Try the Cheatsheet.
- Ask a question in the user group/mailing list.
- If you think something is missing or wrong in the documentation, please file a bug report.
![]()
Table Of Contents
Previous topic
Reading and Writing Images and Video
Next topic
calib3d. Camera Calibration, Pose Estimation and Stereo