アフィン変換(パラメータを与えて,変換行列を求める)
C
#include <cv.h>
#include <highgui.h>

int
main(int argc, char **argv)
{
  double angle = -45.0, scale = 1.0;
  IplImage *src_img = 0, *dst_img = 0;
  CvMat *affine_matrix;
  CvPoint2D32f center;
  CvPoint pt1, pt2;
  CvRect rect;
  char *imagename;

  // (1)load a specified file as a 3-channel color image,
  //    set its ROI, and allocate a destination image
  imagename = argc > 1 ? argv[1] : "../image/building.png";
  src_img = cvLoadImage(imagename, CV_LOAD_IMAGE_COLOR);
  if(src_img == 0)
    return -1;
  dst_img = cvCloneImage(src_img);

  // (2)set ROI
  rect.x = cvRound(src_img->width * 0.25);
  rect.y = cvRound(src_img->height * 0.25);
  rect.width = cvRound(src_img->width * 0.5);
  rect.height = cvRound(src_img->height * 0.5);
  cvSetImageROI(src_img, rect);


  // (3)with specified three parameters (angle, rotation center, scale)
  //    calculate an affine transformation matrix by cv2DRotationMatrix
  affine_matrix = cvCreateMat(2, 3, CV_32FC1);
  center = cvPoint2D32f(src_img->width * 0.25, src_img->height * 0.25);
  cv2DRotationMatrix(center, angle, scale, affine_matrix);

  // (4)rotate the image by warpAffine taking the affine matrix
  cvWarpAffine(src_img, dst_img, affine_matrix, CV_INTER_LINEAR + CV_WARP_FILL_OUTLIERS, cvScalarAll(255));

  // (5)reset ROI, then show source and destination image with a rectangle indicating ROI
  cvResetImageROI(src_img);
  cvResetImageROI(dst_img);
  pt1 = cvPoint(rect.x, rect.y);
  pt2 = cvPoint(rect.x + rect.width, rect.y + rect.height);
  cvRectangle(src_img, pt1, pt2, CV_RGB(255, 0, 255), 2, 8, 0);

  cvNamedWindow("src", CV_WINDOW_AUTOSIZE);
  cvNamedWindow("dst", CV_WINDOW_AUTOSIZE);
  cvShowImage("src", src_img);
  cvShowImage("dst", dst_img);
  cvWaitKey(0);

  cvDestroyWindow("src");
  cvDestroyWindow("dst");
  cvReleaseImage(&src_img);
  cvReleaseImage(&dst_img);
  cvReleaseMat(&affine_matrix);

  return 1;
}
// (1)画像の読み込み(カラー),出力用画像を複製します.
指定されたfファイルを3チャンネルのカラー画像として読み込みます.読み込みに失敗した場合,return -1 で終了します.この入力画像を cvCloneImage により複製し,出力用の画像領域を確保します.また,入力画像と同じサイズ,同じビット深度の出力画像領域を確保します.
// (2)ROIを設定します.
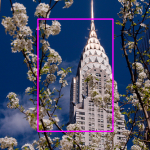
このサンプルでは,画像の一部に対してアフィン変換を行うので,そのためのROIを cvSetImageROI により設定します.ここでは,画像の中心領域(1/4)をROIとしています.
// (3)与えられたパラメータを元に,アフィン変換行列を求めます.
ここでは,回転角度,回転中心,スケーリング係数の3種のパラメータを与え,そこから cv2DRotationMatrix を用いてアフィン変換行列を求めます.また,「アフィン変換(変換前後の3点の組を与えて,変換行列を求める)」の例も参考にしてください.
// (4)アフィン変換行列を用いて画像を回転します.
(3) で求められた行列を用いて, cvWarpAffine によって画像のアフィン変換を行います.
// (5)ROIをリセットし,画像を表示します.
設定したROIを cvResetImageROI によりリセットし,ROIを表す矩形を元画像上に描画します.それを,アフィン変換を施した結果画像と共に表示します.何かキーが押されるまで待ちます.
C++
#include <cv.h>
#include <highgui.h>

using namespace cv;

int
main(int argc, char **argv)
{
  // (1)load a specified file as a 3-channel color image,
  //    set its ROI, and allocate a destination image
  const string imagename = argc > 1 ? argv[1] : "../image/building.png";
  Mat src_img = imread(imagename);
  if(!src_img.data)
    return -1;
  Mat dst_img = src_img.clone();

  // (2)set ROI
  Rect roi_rect(cvRound(src_img.cols*0.25), cvRound(src_img.rows*0.25), cvRound(src_img.cols*0.5), cvRound(src_img.rows*0.5));
  Mat src_roi(src_img, roi_rect);
  Mat dst_roi(dst_img, roi_rect);

  // (2)With specified three parameters (angle, rotation center, scale)
  //    calculate an affine transformation matrix by cv2DRotationMatrix
  double angle = -45.0, scale = 1.0;
  Point2d center(src_roi.cols*0.5, src_roi.rows*0.5);
  const Mat affine_matrix = getRotationMatrix2D( center, angle, scale );

  // (3)rotate the image by warpAffine taking the affine matrix
  warpAffine(src_roi, dst_roi, affine_matrix, dst_roi.size(), INTER_LINEAR, BORDER_CONSTANT, Scalar::all(255));

  // (4)show source and destination images with a rectangle indicating ROI
  rectangle(src_img, roi_rect.tl(), roi_rect.br(), Scalar(255,0,255), 2);

  namedWindow("src", CV_WINDOW_AUTOSIZE);
  namedWindow("dst", CV_WINDOW_AUTOSIZE);
  imshow("src", src_img);
  imshow("dst", dst_img);
  waitKey(0);

  return 0;
}
// (1)画像の読み込み(カラー),出力用画像を複製します.
指定されたfファイルを3チャンネルのカラー画像として読み込みます.読み込みに失敗した場合,return -1 で終了します.この入力画像を Mat.clone メソッドにより複製し,出力用の画像領域を確保します.また,入力画像と同じサイズ,同じビット深度の出力画像領域を確保します.
// (2)ROIを設定します.
このサンプルでは,画像の一部に対してアフィン変換を行うので,そのためのROIを作成します.ここでは,画像の中心領域(1/4)をROIとしています.
// (3)与えられたパラメータを元に,アフィン変換行列を求めます.
ここでは,回転角度,回転中心,スケーリング係数の3種のパラメータを与え,そこから getRotationMatrix2D を用いてアフィン変換行列を求めます.また,「アフィン変換(変換前後の3点の組を与えて,変換行列を求める)」の例も参考にしてください.
// (4)アフィン変換行列を用いて画像を回転します.
(3) で求められた行列を用いて, warpAffine によって画像のアフィン変換を行います.
// (5)ROIを表す矩形を描画し,画像を表示します.
設定したROIを表す矩形を元画像上に描画し,アフィン変換を施した結果画像と共に表示します.何かキーが押されるまで待ちます.


