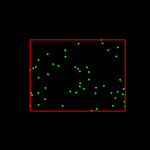
ランダムな点列を包含する矩形
C
#include <cv.h>
#include <highgui.h>

int
main (int argc, char **argv)
{
  int i;
  IplImage *img = 0;
  CvMemStorage* storage = cvCreateMemStorage(0);
  CvSeq *points;
  CvRNG rng = cvRNG(cvGetTickCount());
  CvPoint pt;
  CvRect rect;

  // (1)allocate and initialize an image
  img = cvCreateImage(cvSize(640, 480), IPL_DEPTH_8U, 3);
  cvZero(img);

  // (2)generate and draw a sequence of random 2d points
  points = cvCreateSeq(CV_SEQ_ELTYPE_POINT, sizeof(CvSeq), sizeof(CvPoint), storage);
  for( i = 0 ;i < 50; i++ ) {
    pt.x = cvRandInt(&rng) % (img->width/2) + img->width/4;
    pt.y = cvRandInt(&rng) % (img->height/2) + img->height/4;
    cvSeqPush( points, &pt);
    cvCircle( img, pt, 3, CV_RGB( 0, 255, 0 ), CV_FILLED, 8, 0);
  }

  // (3)calculate and draw a bounding rectangle of points
  rect = cvBoundingRect( points, 0 );
  cvRectangle( img, cvPoint(rect.x, rect.y),
	       cvPoint(rect.x+rect.width, rect.y+rect.height), CV_RGB(255,0,0), 2, 8, 0);

  // (4)show the iamge, and quit when any key pressed
  cvNamedWindow ("BoundingRect", CV_WINDOW_AUTOSIZE);
  cvShowImage ("BoundingRect", img);
  cvWaitKey (0);

  cvDestroyWindow("BoundingRect");
  cvReleaseImage(&img);
  cvReleaseMemStorage(&storage);

  return 0;
}
// (1)画像領域を確保し,初期化します.
cvCreateImage によって,指定のサイズ,ビット深度の画像を作成した後に,cvZero を用いて画像を黒で塗りつぶして初期化します.この関数は,次のようにマクロ定義されたものです.
#define cvZero cvSetZero
// (2)ランダムな2次元座標列を生成し,その座標を中心とする円を描画します.
cvCreateSeq によって確保されたシーケンスに,ランダムに生成された座標を代入します. cvRandInt によって生成された疑似乱数は,画像の中心部(全体の面積の1/4)にあるように調整され, cvSeqPush によりシーケンスに追加されます.また,それぞれの座標を中心として円を描画する(cvCircle)ことで,生成された点列を可視化します.
// (3)点列の包含矩形を求め,それを描画します.
cvBoundingRect を用いて,生成された点列を包含するような最小の矩形を求めます.ただし,この矩形は傾き(回転)が考慮されません.これが cvMinAreaRect2 との違いであり,前者は cvRect を返しますが,後者は CvBox2D を返します.求められた矩形を cvRectangle によって描画します.
// (4)画像を表示し,何かキーが押されると終了します.
結果画像を表示し,何かキーが押された場合にはプログラムを終了します.
C++
#include <cv.h>
#include <highgui.h>

using namespace cv;

int
main (int argc, char **argv)
{
  // (1)allocate and initialize an image
  Mat img = Mat::zeros(Size(640, 480), CV_8UC3);
  if(!img.data) return -1;

  // (2)generate a sequence of random 2d points
  Mat points(Size(50, 1), CV_32SC2);
  /// randu(points, Scalar(img.cols/4, img.rows/4), Scalar(img.cols*3./4., img.rows*3./4.));
  RNG(getTickCount()).fill(points, RNG::UNIFORM, Scalar(img.cols/4, img.rows/4), Scalar(img.cols*3./4, img.rows*3./4));

  // (3)draw the points as small circles
#if 1
  MatIterator_<Vec2i> it = points.begin<Vec2i>(), it_end = points.end<Vec2i>();
  for(; it!=it_end; ++it) {
    circle(img, Point((*it)[0], (*it)[1]), 3, Scalar(0,255,0), -1);
  }
#elif 1
  vector<Mat> planes;
  split(points, planes);
  MatIterator_<int> it0 = planes[0].begin<int>(), it0_end = planes[0].end<int>();
  MatIterator_<int> it1 = planes[1].begin<int>();
  for(; it0 != it0_end; ++it0, ++it1) {
    circle(img, Point(*it0, *it1), 3, Scalar(0,255,0), -1);
  }
#else
  /// only if points has no gap
  int *p = points.ptr<int>();
  int inc = points.elemSize()/sizeof(int);
  for(int i=0; i<points.cols; i++, p+=inc) {
    circle(img, Point(p[0], p[1]), 3, Scalar(0,255,0), -1);
  }
#endif

  // (4)calculate and draw a bounding rectangle of points
  Rect brect = boundingRect(points);
  rectangle(img, brect.tl(), brect.br(), Scalar(0,0,255), 2);

  // (5)show the iamge, and quit when any key pressed
  namedWindow("img", CV_WINDOW_AUTOSIZE);
  imshow("img", img);
  waitKey(0);

  return 0;
}
// (1)画像領域を確保し,初期化します.
Matlab 形式の Mat::zeros を利用して,0で初期化された Mat クラスのインスタンスを作成します.
// (2)ランダムな2次元座標列を生成します.
指定範囲内(上述のCの例と同様)に一様分布する疑似乱数で,行列を埋めます.
ここでは,低レベルな関数 RNG を利用して行列を埋めていますが, randu を利用しても同様のことが可能です.ただし,randu
は,常に同じシードを利用するデフォルト乱数生成器を利用するため,常に同じ順列の乱数が生成されます.実行の度に異なる乱数を使用したい場合には,例えばここで用いているように getTickCount を利用して乱数を生成します.
// (3)それぞれの点を描画します.
イテレータを利用して行列内を横断し, circle を用いて各点を中心とする円を描画します.
また,マクロでコメントアウトされているように,
・チャンネル毎(x座標とy座標)のイテレータを利用する方法
  vector<Mat> planes;
  split(points, planes);
  MatIterator_<int> it0 = planes[0].begin<int>(), it0_end = planes[0].end<int>();
  MatIterator_<int> it1 = planes[1].begin<int>();
  for(; it0 != it0_end; ++it0, ++it1) {
    circle(img, Point(*it0, *it1), 3, Scalar(0,255,0), -1);
  }
・ポインタを利用する方法(gapがない場合)
  int *p = points.ptr<int>();
  int inc = points.elemSize()/sizeof(int);
  for(int i=0; i<points.cols; i++, p+=inc) {
    circle(img, Point(p[0], p[1]), 3, Scalar(0,255,0), -1);
  }
などでも同様のことが可能です.
// (4)点列の包含矩形を求め,それを描画します.
boundingRect を用いて,生成された点列を包含するような最小の矩形を求めます.ただし,この矩形は傾き(回転)が考慮されません.これが minAreaRect との違いであり,前者は Rect を返しますが,後者は RotatedRect を返します.求められた矩形を rectangle によって描画します.
// (5)画像を表示し,何かキーが押されると終了します.
結果画像を表示し,何かキーが押された場合にはプログラムを終了します.


